本文主要记录WSL2下通过k8s管理GPU用于模型WDDM、推理和转码的原理和流程,分为部署、推理、转码三个部分。
部署
环境
显卡:
4卡L20或8卡 5090WSL2:
Wsl2:2.6.2.0Ubuntu:24.04
Windows:
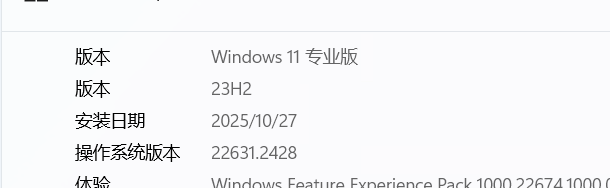
Windows:win11 23H2 22631.2428
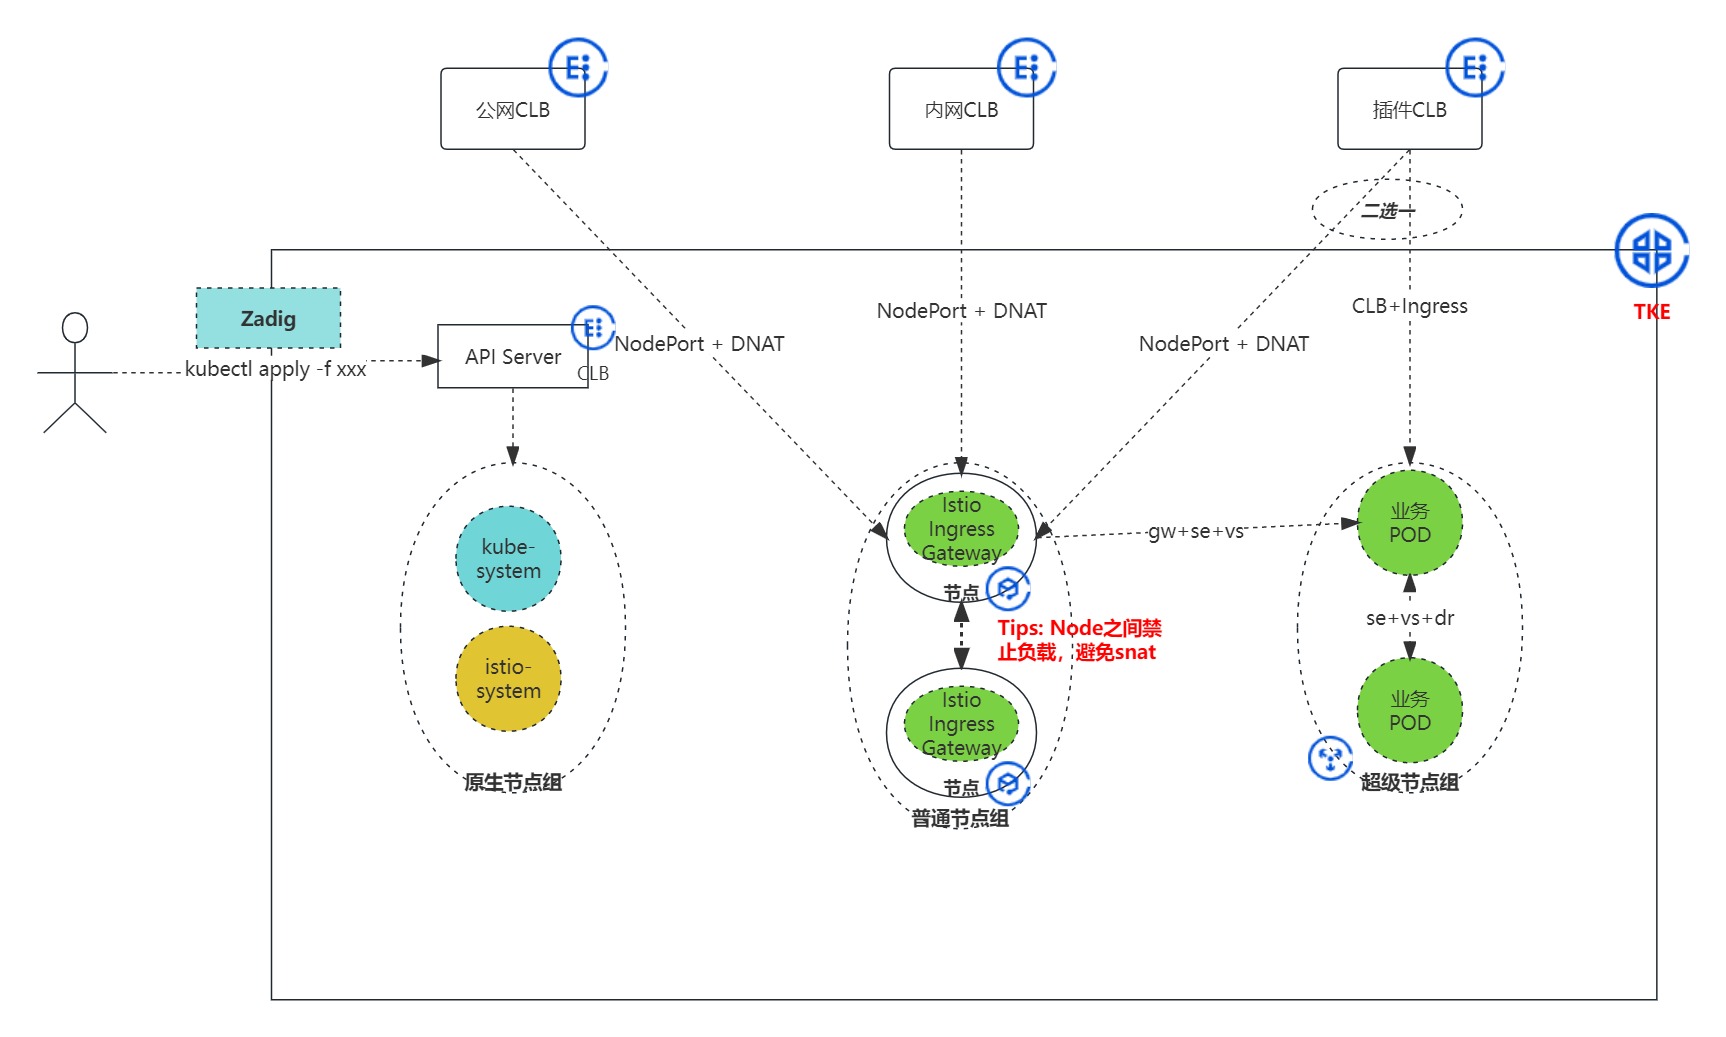
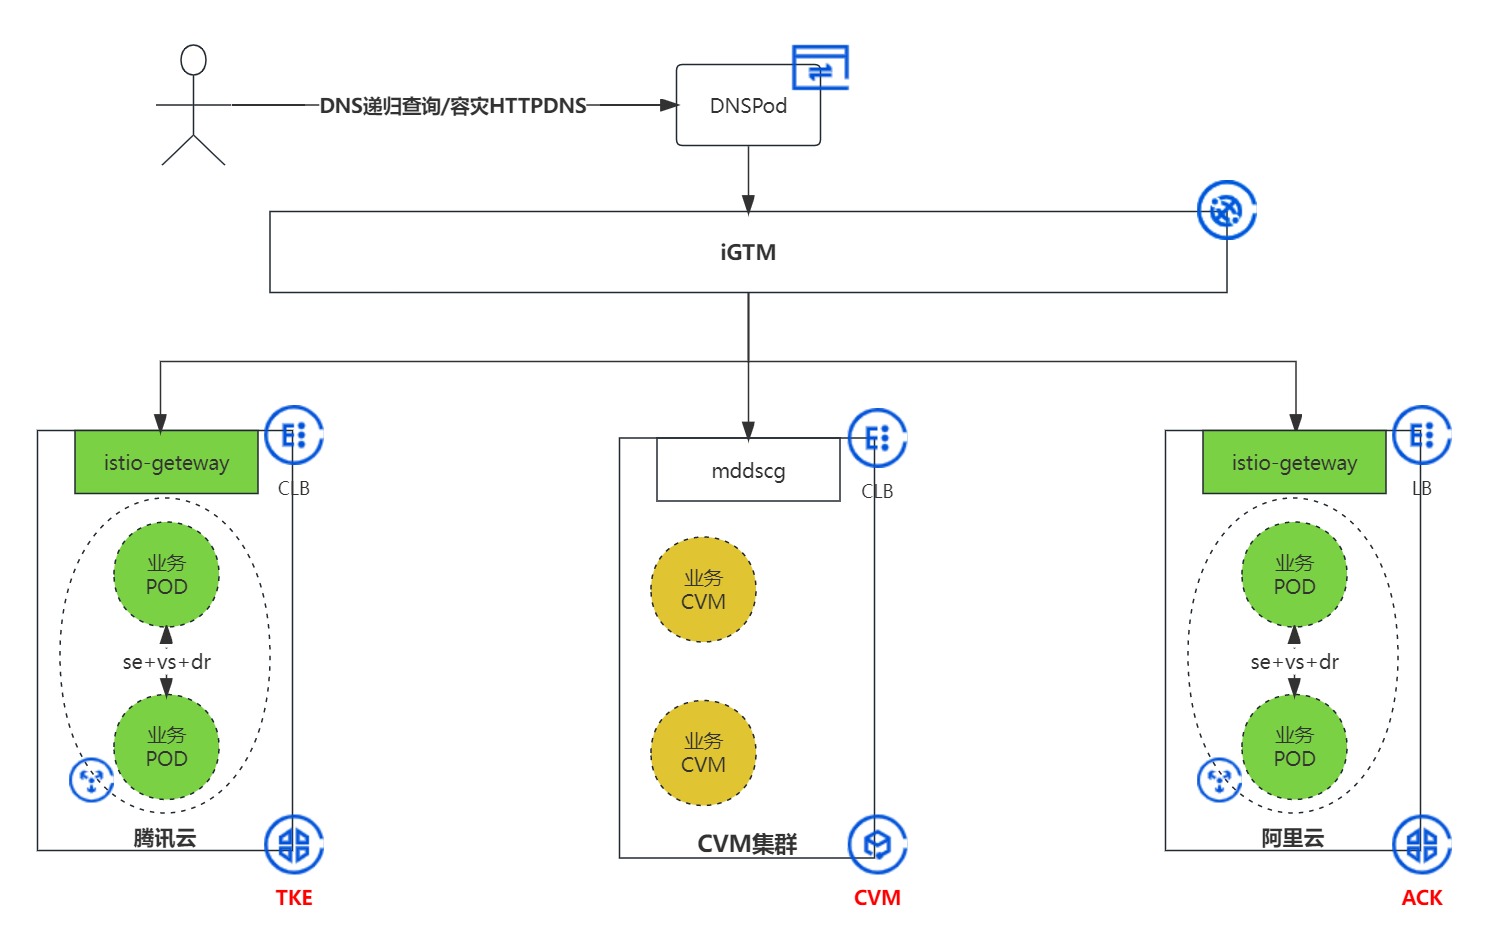
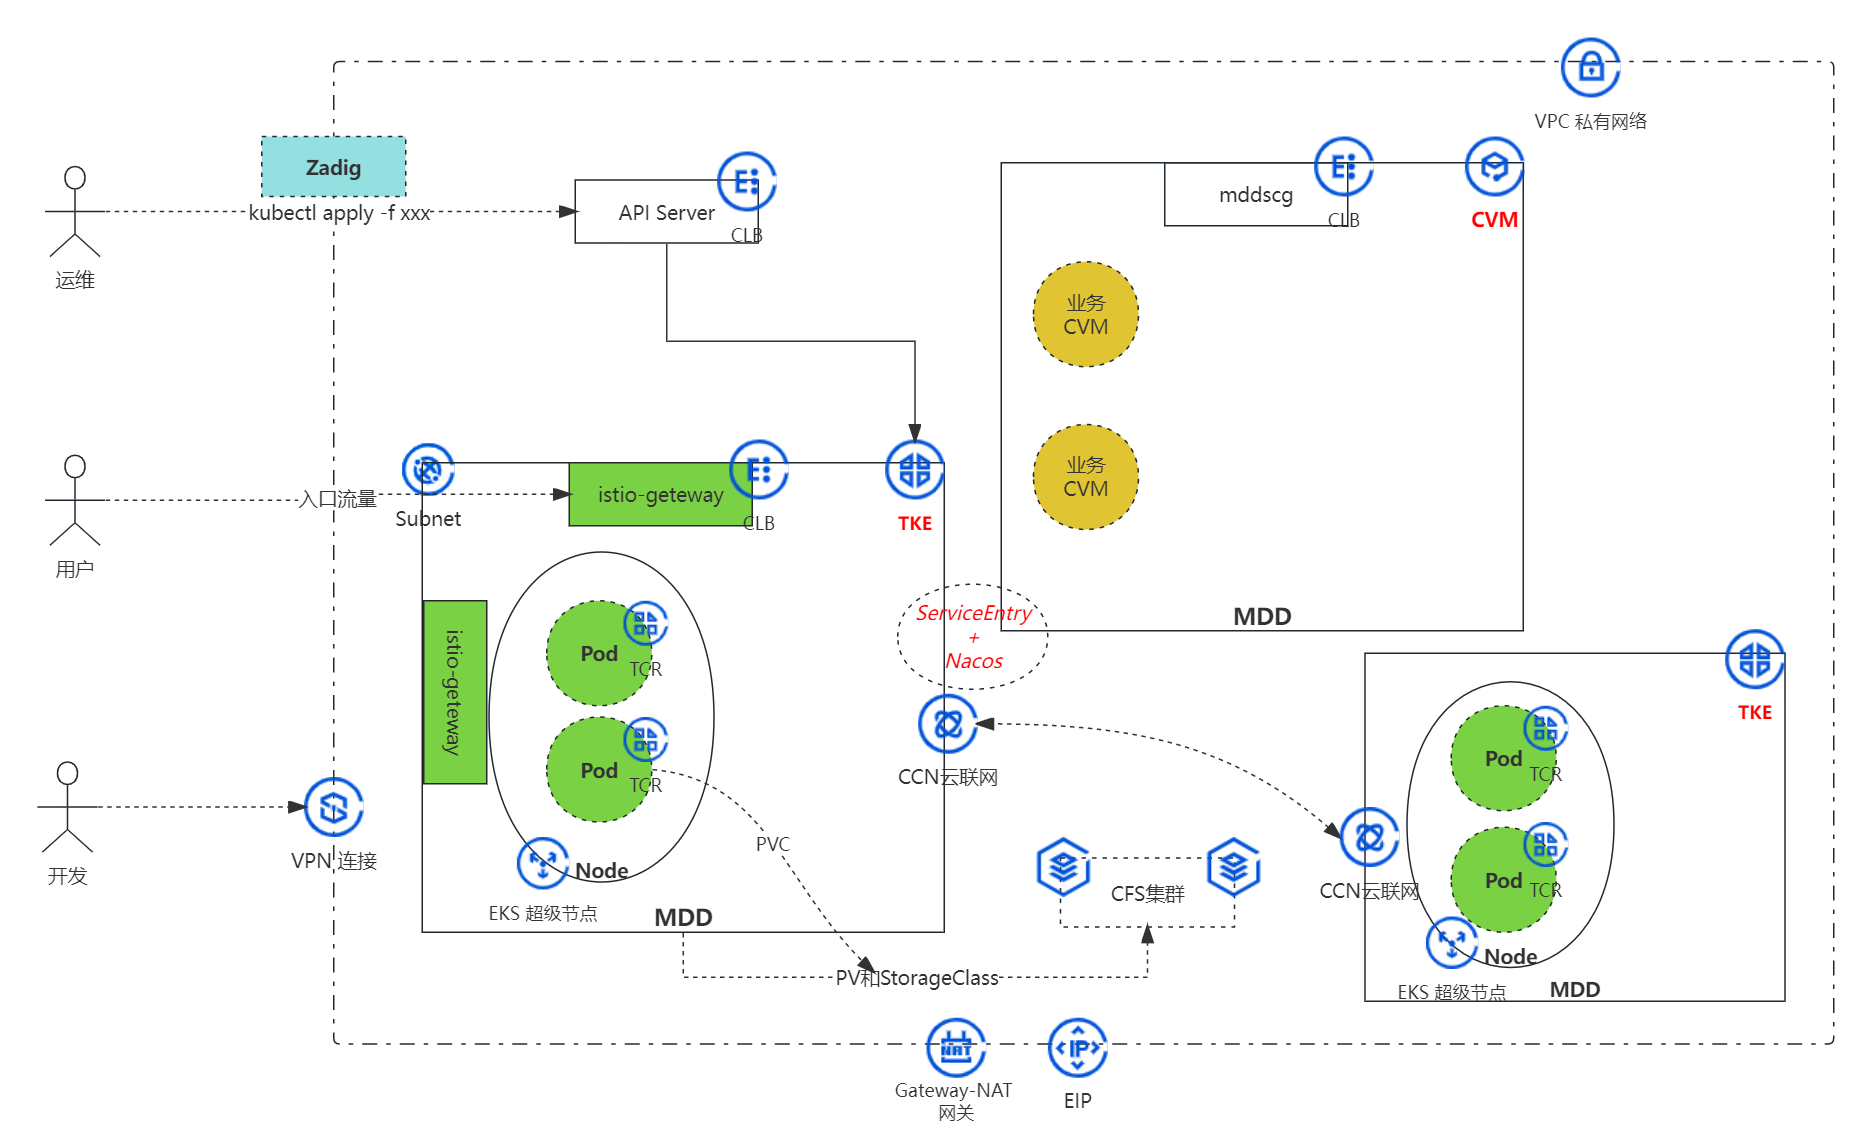
架构图
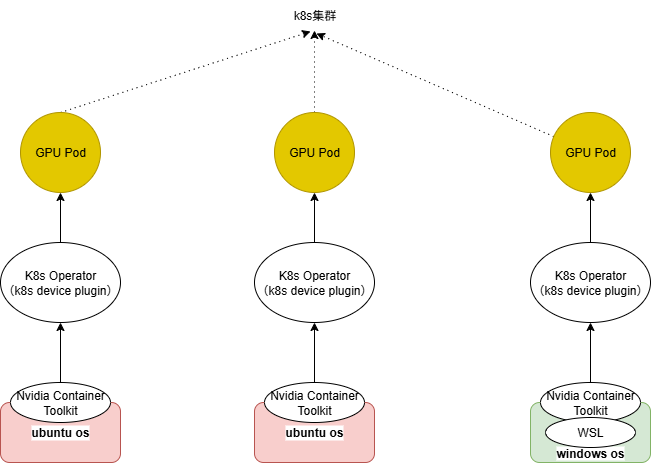
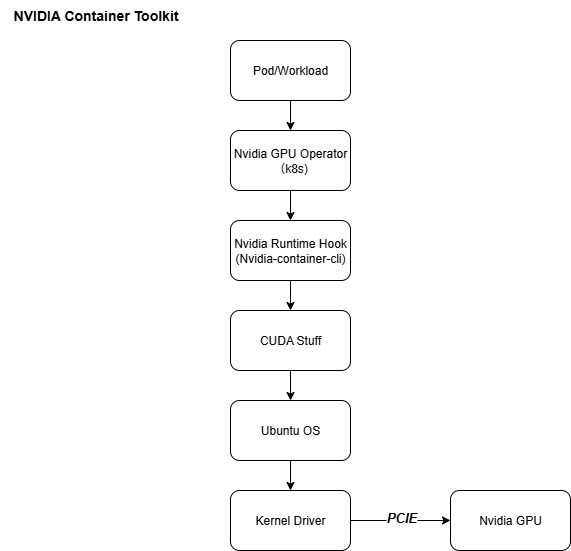
pod视角
pod--> nvidia-cuda-toolkit --> wsl2 --> nvidia-container-toolkit --> windows driver
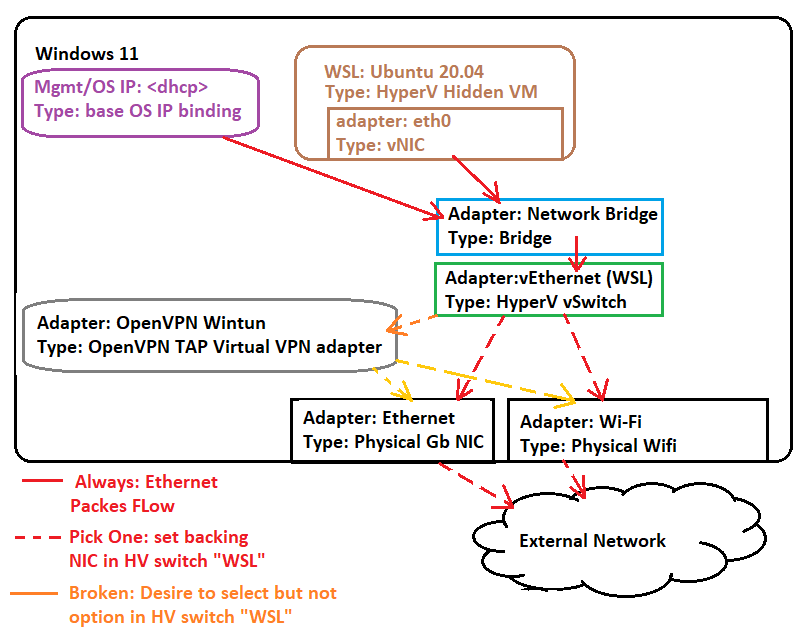
网络(Bridge)
- 原理图
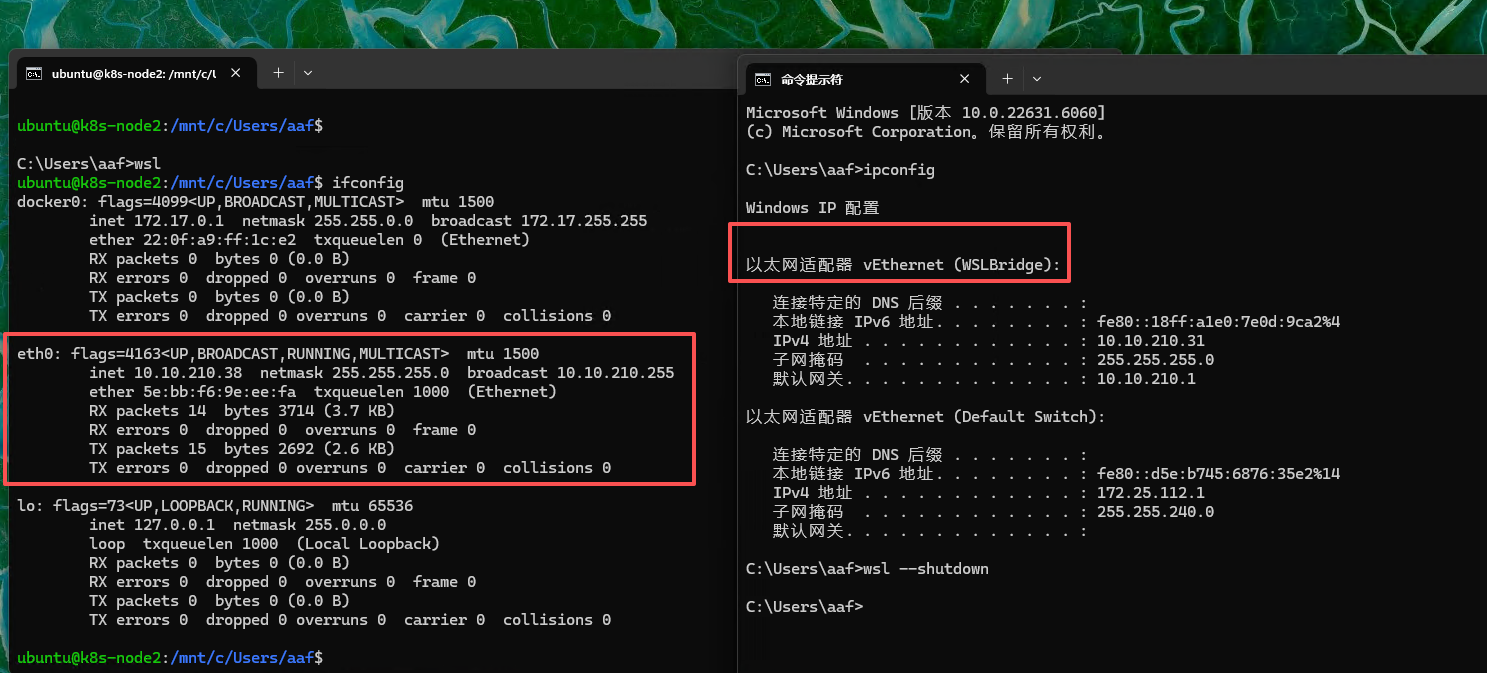
- 效果图
配置方式
vSwitch: Hyper-V创建Virtual Switches.wslconfig:用户目录配置.wslconfig,内容如下:1
2
3
4
5[ws12]
networkingMode-bridged
vmSwitch=WSLBridge
dhcp=false
swap=0 ##K8S集群必须关闭SWAP
注意点:
Bridge模式主要用于K8S的混合节点通信,对齐同一网络平面- 默认的
Mirrored无法支持 WSL2的Bridge模式不支持挂载多张网卡
Nvidia
Nvidia-Container-Toolkit
指南
https://docs.nvidia.com/datacenter/cloud-native/container-toolkit/1.9.0/nvidia-containerd.html
安装
1
2
3
4
5
6
7
8
9
10
11
12
13
14
15
16
17
18
19# Install the prerequisites for the instructions below:
sudo apt-get update && sudo apt-get install -y --no-install-recommends \
curl \
gnupg2
# Configure the production repository:
curl -fsSL https://nvidia.github.io/libnvidia-container/gpgkey | sudo gpg --dearmor -o /usr/share/keyrings/nvidia-container-toolkit-keyring.gpg \
&& curl -s -L https://nvidia.github.io/libnvidia-container/stable/deb/nvidia-container-toolkit.list | \
sed 's#deb https://#deb [signed-by=/usr/share/keyrings/nvidia-container-toolkit-keyring.gpg] https://#g' | \
sudo tee /etc/apt/sources.list.d/nvidia-container-toolkit.list
# Install the NVIDIA Container Toolkit packages:
sudo apt-get update
export NVIDIA_CONTAINER_TOOLKIT_VERSION=1.18.1-1
sudo apt-get install -y \
nvidia-container-toolkit=${NVIDIA_CONTAINER_TOOLKIT_VERSION} \
nvidia-container-toolkit-base=${NVIDIA_CONTAINER_TOOLKIT_VERSION} \
libnvidia-container-tools=${NVIDIA_CONTAINER_TOOLKIT_VERSION} \
libnvidia-container1=${NVIDIA_CONTAINER_TOOLKIT_VERSION}配置(
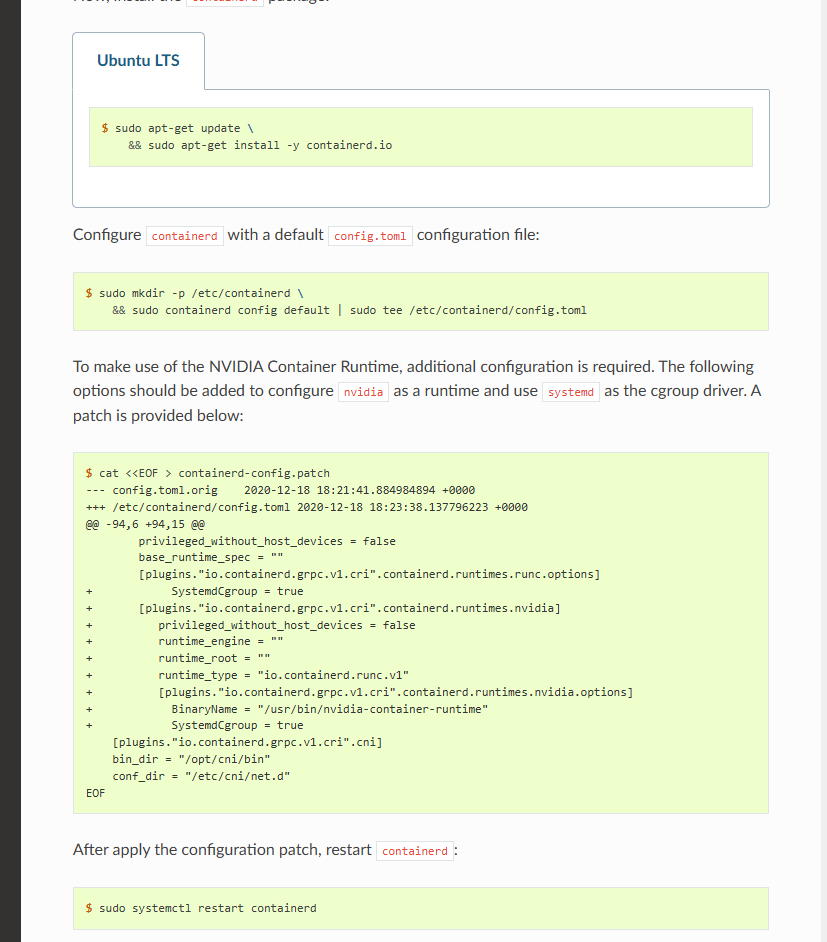
Containerd)1
2
3
4# Configure the container runtime by using the nvidia-ctk command:
sudo nvidia-ctk runtime configure --runtime=containerd
# Restart containerd:
sudo systemctl restart containerd补丁
Nvidia-Device-Plugin
作用
1
仅用于GPU的申请和调度
Prerequisites
1
2
3
4
5
6The list of prerequisites for running the NVIDIA device plugin is described below:
NVIDIA drivers ~= 384.81
nvidia-docker >= 2.0 || nvidia-container-toolkit >= 1.7.0 (>= 1.11.0 to use integrated GPUs on Tegra-based systems)
nvidia-container-runtime configured as the default low-level runtime
Kubernetes version >= 1.10Quick Start
1
2
3# 1. configure containerd
# 2. Daemonset
kubectl create -f https://raw.githubusercontent.com/NVIDIA/k8s-device-plugin/v0.17.1/deployments/static/nvidia-device-plugin.yml
Nvidia-CUDA-Toolkit
以cuda 13.0.0和ubuntu 24.04为例
13.0.0-base-ubuntu24.04(FFmpeg)
1
Includes the CUDA runtime (cudart)
13.0.0-runtime-ubuntu24.04(推理)
1
Builds on the base and includes the CUDA math libraries, and NCCL. A runtime image that also includes cuDNN is available. Some images may also include TensorRT.
13.0.0-devel-ubuntu24.04(构建)
1
Builds on the runtime and includes headers, development tools for building CUDA images. These images are particularly useful for multi-stage builds.
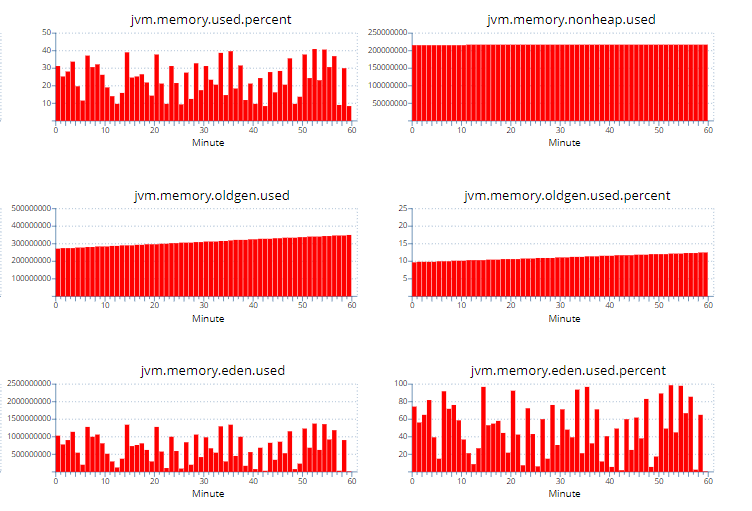
推理
vLLM
兼容性:
Qwen3-VL-32B:qwen3-vl需要vLLM>=0.11.0,单卡显存不足,需要多卡- 由于
WSL2不支持NCCL的P2P,需要使用SHM进行多卡通信
部署
1
2
3
4
5
6
7
8
9
10
11
12
13
14
15
16
17
18
19
20
21
22
23
24
25
26
27
28
29
30
31
32
33
34
35
36
37
38
39
40
41
42
43
44
45
46
47
48
49
50
51
52
53
54
55
56
57
58
59
60
61
62
63apiVersion: apps/v1
kind: Deployment
metadata:
namespace: dev
name: vllm-v1
labels:
app: vllm-v1
spec:
replicas: 1
strategy:
type: Recreate
selector:
matchLabels:
app: vllm-v1
template:
metadata:
labels:
app: vllm-v1
spec:
nodeSelector:
node-role.kubernetes.io/worker-gpu: "true"
containers:
- name: vllm
env:
- name: NCCL_CUMEM_ENABLE
value: "0"
image: docker.1ms.run/vllm/vllm-openai:v0.11.1
imagePullPolicy: IfNotPresent
command:
- sh
- -c
- |
vllm serve "/models/Qwen/Qwen3-VL-32B-Instruct" \
--served-model-name "Qwen3-VL-32B-Instruct" \
--tensor-parallel-size 4 \
--port 9999 \
--max-model-len 32768 \
--gpu-memory-utilization 0.85 \
--max-num-seqs 10 \
--max-num-batched-tokens 32768 \
--dtype bfloat16
ports:
- containerPort: 9999
name: http
resources:
limits:
nvidia.com/gpu: "4"
requests:
nvidia.com/gpu: "4"
volumeMounts:
- mountPath: /models
name: qwen-data
subPathExpr: models
- mountPath: /dev/shm
name: dshm
volumes:
- name: qwen-data
persistentVolumeClaim:
claimName: pvc-nas-test
- name: dshm
emptyDir:
medium: Memory
sizeLimit: 16G
转码
FFmpeg
兼容性:
- 安装:来源于
https://github.com/BtbN/FFmpeg-Builds,也可以编译定制 WSL2:由于WSL2默认只会自动挂载libcuda.so,ffmpeg对应的编解码需要手动挂载
- 安装:来源于
部署
1
2
3
4
5
6
7
8
9
10
11
12
13
14
15
16
17
18
19
20
21
22
23
24
25
26
27
28apiVersion: apps/v1
kind: Deployment
metadata:
namespace: dev
name: ffempeg-cuda-v1
labels:
app: ffempeg-cuda-v1
spec:
replicas: 1
selector:
matchLabels:
app: ffempeg-cuda-v1
template:
metadata:
name: ffempeg-cuda-v1
labels:
app: ffempeg-cuda-v1
spec:
containers:
- name: ffempeg-cuda-v1
image: docker.1ms.run/nvidia/cuda:12.6.3-base-ubuntu22.04
imagePullPolicy: IfNotPresent
command:
- sh
- -c
- |
tail -f /dev/null
restartPolicy: Always测试用例
1
2
3
4
5
6./ffmpeg -hwaccel cuda -hwaccel_output_format cuda \
-threads 2 \
-i input.mp4 \
-vf "scale_cuda=854:480" \
-c:v h264_nvenc -preset p1 -cq 28 \
-c:a copy -y output.mp4
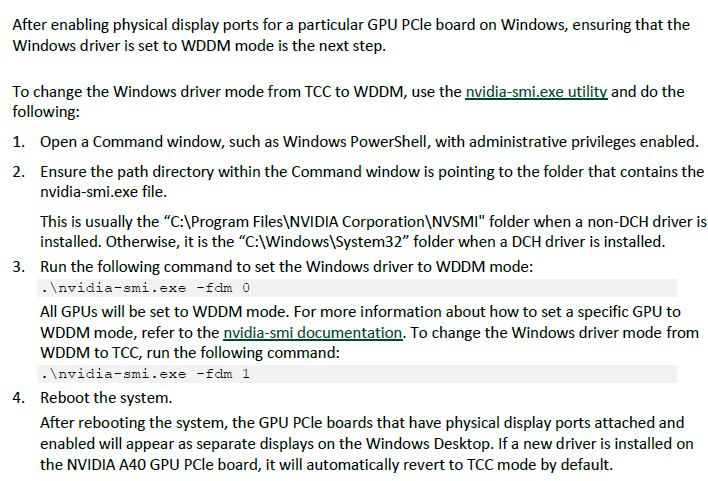
WDDM
L20
作用:
Windows宿主机通过WDDM使用dxdiag识别显卡,支持运行windows的图形软件支持模式
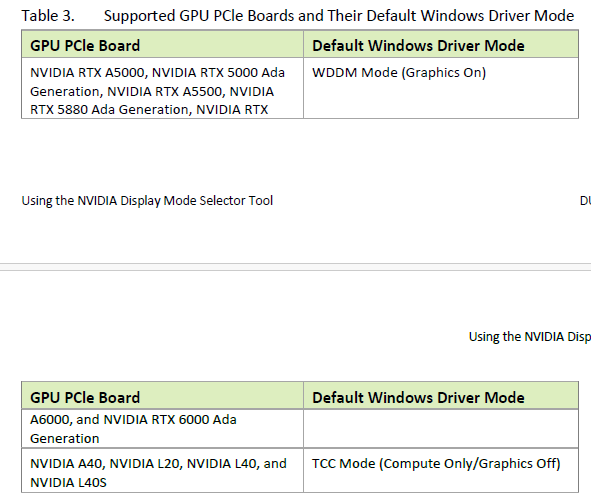
开启
Physical Display Modes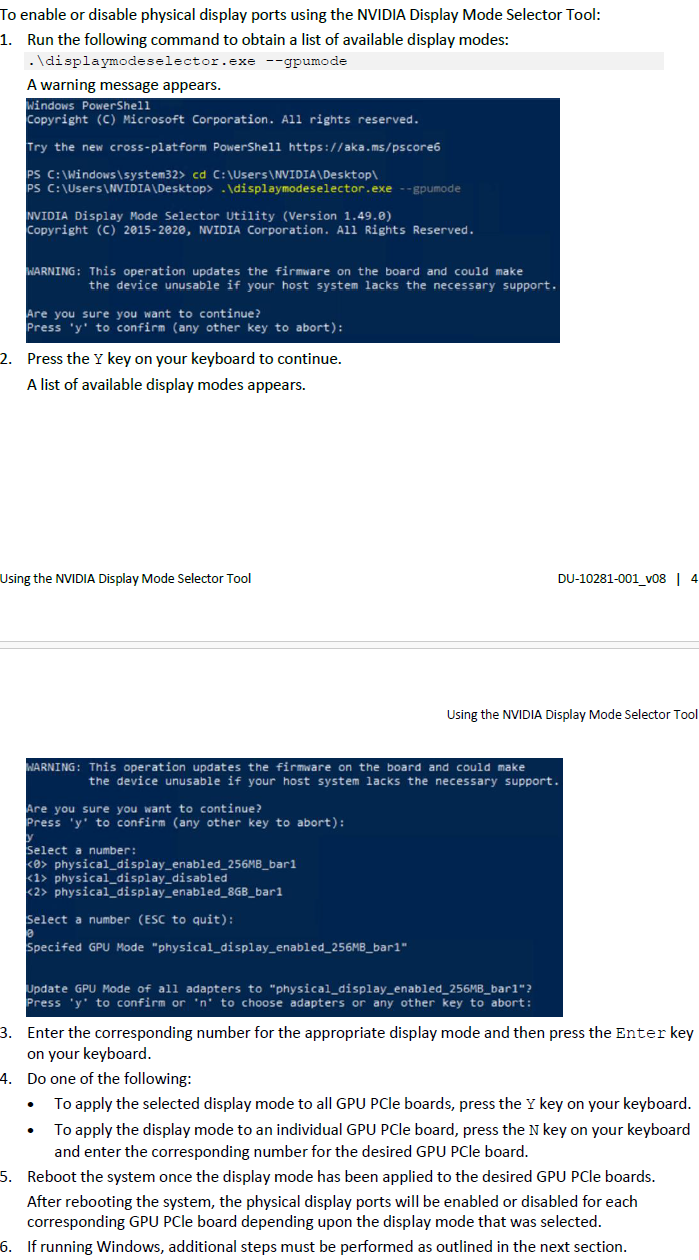
TCC改为WDDM